April 10, 2023
Converting a 5K iMac into an External 5K Display
[Update: How I converted this iMac external display to use a VESA mount. 2023-06-27]
Apple finally released the Studio Display in 2022. My initial reaction was to purchase one, even with the starting price of $1599. I’ve really wanted a 27-inch 5K display for a while and wasn’t willing to go with the 5K 27-inch LG UltraFine after a bad experience with the 4K 24-inch version. I was ready to pull the trigger, but I soon learned about the many drawbacks, like having only a single input source, one Thunderbolt 3 port, no external power button, and worst of all, running some version of iOS that needs firmware and software updates!
The Apple Studio Display is basically an improved version of the LCD screen from the 27-inch 5K iMac. What if there was a way to use a 27-inch 5K iMac as an external display? Unfortunately, Apple removed the ability to use target display mode on the iMac a while ago.
At work, we had a few late-2015 27-inch 5K iMacs that were set to be recycled, so I set out to see if there was any way to convert one into an external display. After doing some research, I found that there was indeed a way to do this, so I gave it a shot. This post documents how I did it, so maybe you can too if you’d like.
Disclaimer: While I do have experience building electronic stuff and taking apart electronic equipment, I’m no expert. If you decide to move forward with this project, understand that you may irreparably damage your iMac in the process. I accept no responsibility for any damage that occurs to you, your iMac, or any other parts or tools you might use for this project. You accept any and all risk to yourself and your equipment by following the guide below.
Full disclosure: Purchasing any of the items using some of the links below will give a small percentage of the sale to my wife.
Note: This guide isn’t the only way to convert an iMac into an external display. There are many others that have successfully done this conversion and have shared their advice, configurations, and builds using 5K iMac and LG Ultra Fine displays, so be sure to do your research before starting1.
So how exactly does this work?
In order to convert a 27-inch 5K iMac into an external display, it needs to be disassembled and all of the internals removed. Next, a component called a display driver board needs to be purchased. The driver board will be installed inside the empty iMac chassis and connected directly to the LCD panel of the iMac. The driver board provides multiple HDMI and Display Port inputs, a power port, and a headphone jack. Using these connections on the driver board, the iMac can be converted into an external display.
Why would I want to do this instead of purchasing an Apple Studio Display?
I can think of a couple of reasons why. If you don’t already have a 27-inch 5K iMac sitting around, you can probably get an older 2015 model fairly cheaply. Add in the driver board, tools, and supplies, and you’re still way under the cost of an Apple Studio Display.
If you already have a 27-inch 5K iMac sitting around, instead of selling it, why not convert it into a beautiful 5K display that can attach to multiple devices and costs way less than an Apple Studio Display?
Drawbacks
The completed project isn’t without some minor drawbacks, but none of them should be dealbreakers.
- Using the iMac as an external display makes it feel much larger than a normal 27” display, mostly because of the large borders around it and the large aluminum chin.
- There is no built-in ability to adjust the display’s height.
- Adding connections to the rear of the iMac isn’t as aesthetically pleasing as a real display. (If you’re crafty with a 3D printer, I’m sure you could come up with a way to make it pretty.)
About this guide
This project is fairly easy if you are comfortable taking electronic things apart, reading directions and taking your time. It’s not necessarily a project you’d want to do as your first electronics DIY (but don’t let that stop you). Take your time and be patient while disassembling the iMac. Read the instructions and make sure you have all of the tools and parts needed to complete the project before starting.
1. Determine the model of iMac you have
You’ll need to do the following in order to purchase the correct display driver board.
- Find the model number of your iMac.
- Find the model number of the iMac’s LCD screen.
How to find the model number of your iMac
In order to find out your iMac model number, do the following on your iMac:
- Press and hold the Option key on your keyboard while choosing Apple menu > System Information from the menu bar.
- Select Hardware in the sidebar.
- Find the model number on the right.
If your iMac isn’t able to be powered up, use Apple’s guide to figure out the model number.
Once you have the iMac’s model number, write it down.
Get the model number of the iMac’s LCD screen
Next, let’s figure out the LCD display model number. From what I can tell, Apple used different 5K displays depending on the year the iMac was manufactured. The most accurate way to get the display model number is to remove the LCD panel from the iMac. There may be other ways to determine this without taking the iMac apart, but because you need this information to purchase the correct display driver board, it’s better to be safe than sorry.
Purchase this iFixit Adhesive Strips Compatible with iMac Intel 27” (2012-2019) - Repair Kit. This kit includes the tool to remove the LCD panel as well as the adhesive strips you’ll need to put the screen back on the iMac. Don’t buy anything else until you get the model number of the LCD panel.
When the iFixit kit arrives, use this guide to disassemble the screen. In case you are wondering, I didn’t purchase the iMac cardboard service wedge as shown in Step 1 of the guide. I didn’t find it was necessary. I also just used two old credit cards instead of the iFixit plastic cards. Remember, take your time and be extremely careful when removing the LCD panel from the iMac. The glass panel is extremely fragile and prone to cracking. Follow the guide and take your time.

The iMac display removed and resting on a something soft. The sticker with LCD model info in white on the left side of the screen.
Once the LCD panel is off of the iMac, lay it on a towel or something that won’t scratch it, then find the model number located on the sticker on the rear of the panel and write it down. The late 2015 iMac I used had the display model number LM270QQ1(SD)(A2). Carefully store the display someplace safe, or put the display back on the iMac and use some strapping tape on the corners of the screen to secure it to the iMac chassis while you order the parts for this project.
2. Purchase the correct driver board and parts

This is a close up of the `R9A18` driver board I used for this project that shows what each port is for. There are other driver boards available that may be better or more suitable depending on your iMac.
Now that you have your iMac model number and LCD panel model number, it’s time to purchase the driver board. Using the information you wrote down, search eBay for the iMac model number and display model number, then add the key words driver board.
For example, searching for the A1419 LM270QQ1 driver board will bring up a listing of driver boards to choose from. A majority of these are sold and shipped directly from China. Aliexpress also sells these types of driver boards, but I have no experience ordering from them. I purchased the “R9A18” 5K driver board, one similar to this, off of eBay for about $180 + shipping. There is also a higher-spec’d “R1811” 5K driver board that could also work. I haven’t tried it, but many people that do these conversions have had success using this board too.

Some vendors will ask you to choose the correct driver board kit to match your display.
Once you choose a driver board, be sure to select the correct kit type that goes with the iMac LCD panel. The driver board I ordered had many different kits available, such as (A2), (C1), (B1), (D1), (E1), and (F1). The correct kit for this display was (SD)(A2) because the LCD model number was LM270QQ1(SD)(A2). The "R9A18" 5K driver board that I used has 2 x DP and 2 x HDMI input ports. The DP port has a maximum resolution of 5120x2880 at 60Hz2, while the HDMI port has a maximum resolution of 3840x2160 at 60Hz. It supports HDMI 2.0, DP 1.1 and 1.2 protocols, and an audio output.
In addition, the card has an external keypad panel that supports brightness, contrast, color balance, color temperature, and other controls. Some kits also come with a remote control.
3. Order everything else
While you’re waiting for the driver board kit to arrive, it’s time to order a few other items to complete this project.
Tools
These are the tools you’ll need to disassemble the iMac. If you don’t have any of these tools already, the iFixit Mako Driver Kit and iFixit Prying and Opening Tool Assortment should have everything you need. If you don’t need everything in these kits, you can purchase the following items individually:
- Torx T5, TR8, TR10 drivers
- Philips #00 screwdriver
- 2 x Plastic cards (old credit cards work as well)
- Spudger
Power adapter for the driver board
The driver board will need to be powered by an external source, so check if the driver board kit comes with a power supply. The one I used did not. My driver board kit required a 12V DC power adapter at either 5, 6 or 7 amps. The DC jack inner and outer diameter is 2.5mm and 5.5mm and the center was “+”. Co-workers found one of these for me to use, but if you need to purchase something similar, take a look at this one and see if the specs will work with your driver board.
Cables
Purchase the cables needed to connect your external device to the driver board. For this particular board, I went with a good-quality DP 2.1 cable and high-speed HDMI cables.
Driver board installation parts
You’re going to need a way to mount the driver board kit to the interior of the iMac. The supplies below are what I used to ensure a clean installation and to make sure wires are fastened down and don’t move around after assembly is completed. If you’re not keen on purchasing 100 pieces of stick-on PCB spacer standoffs, check if your local hardware or electronics store has some in lower quantities. I’ve also seen others use hot glue or duct tape to fasten the driver board to the iMac (I wouldn’t do that, but it’s your choice).
- Stick-on nylon plastic PCB spacer standoff
- Zip ties (Any hardware or dollar store should have these)
- Zip Tie Mounts
OPTIONAL:

An example of a 1 foot HDMI extension cable.
When this project has been completed, the driver board will be sealed inside the iMac. The only way to access it will be to disassemble the LCD screen from the iMac chassis. With this in mind, consider purchasing short extension cables for all of the inputs you plan to use.
The extension cables (about 1 foot each) have a male plug on one end and a female plug on the other. Inserting the male side of the plug into the driver board allows you to extend the female end out the RAM door located on the rear of the iMac. This allows the extension cables to be permanently connected to the driver board but also allows you to easily connect and disconnect input connections like power, HDMI, and DP cables without needing to disassemble the entire iMac! Again, these are optional, but you should seriously consider purchasing them.
One last thing: purchase good-quality, high-speed extensions that aren’t too long. 1 foot or so is all you’ll need to route the cable outside of the iMac chassis.
- 2 x 4K HDMI 2.0 extension cable 1.5 feet (these aren’t 1 foot, but it’s what I purchased for this project.)
- 2 x DP 1.2 extension cable, 1 foot
- 1 x Power Extension Cable, DC 5.5mm x 2.5mm (This comes with 2 power extension cables)
- 1 x 3.5mm Audio Extension Cable, 1 foot
4. Test the driver board and display
Once all of the items arrive, you’re ready to begin this project. Start by attaching the display driver card to the iMac LCD panel. Gently install both the LCD cable and the backlight cable. The LCD cable on my driver board had a cable with a “white dot” on the connector to indicate the proper orientation of the cable. The white dot should be facing up when installing into the LCD panel. The backlight connector cable on the driver board will connect to the other cable on the LCD panel. Orient the backlight cable from the driver board so that the red wire is on the right side of the connector when attaching.
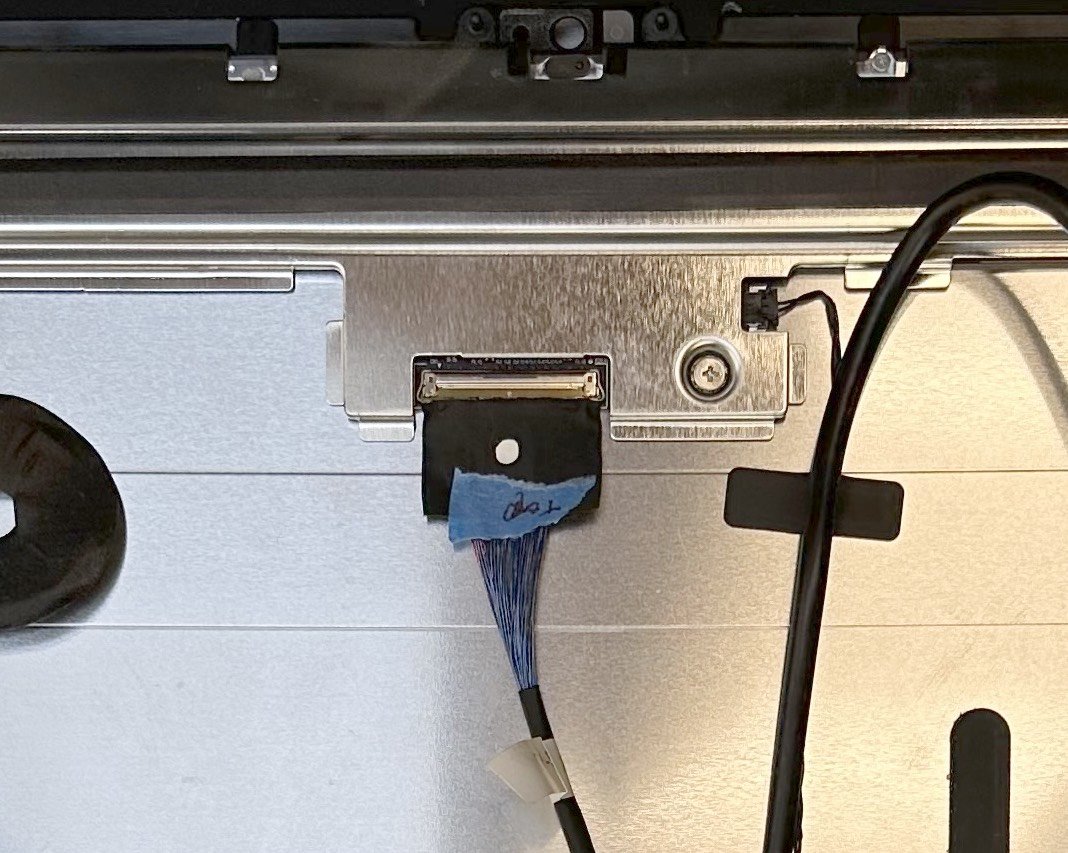
A close up of the white dot on the LCD cable.
Next, plug the 12V DC power adapter into the driver board and check that the display turns on. The LED on the attached keypad should also light up. Next, plug your Mac into one of the input ports using either the HDMI or DP cable. If nothing shows up on the LCD screen, recheck that the LCD and backlight cable are attached securely and correctly to the LCD panel and try again. You may also need to try switching to the proper input using the keypad (see step 9 for keypad controls).

Go to System Settings > Display, then click on the external display to check the display settings.
The screen should light up and extend your Mac’s display. Go to System Settings > Displays and check that the display shows up. If it does, you’re all good! This would be a good time to test all of the inputs you plan to use, as well as any extension cables (optional). Attach your external device to each input and extension cable, and make sure the display works.
5. Gut the iMac
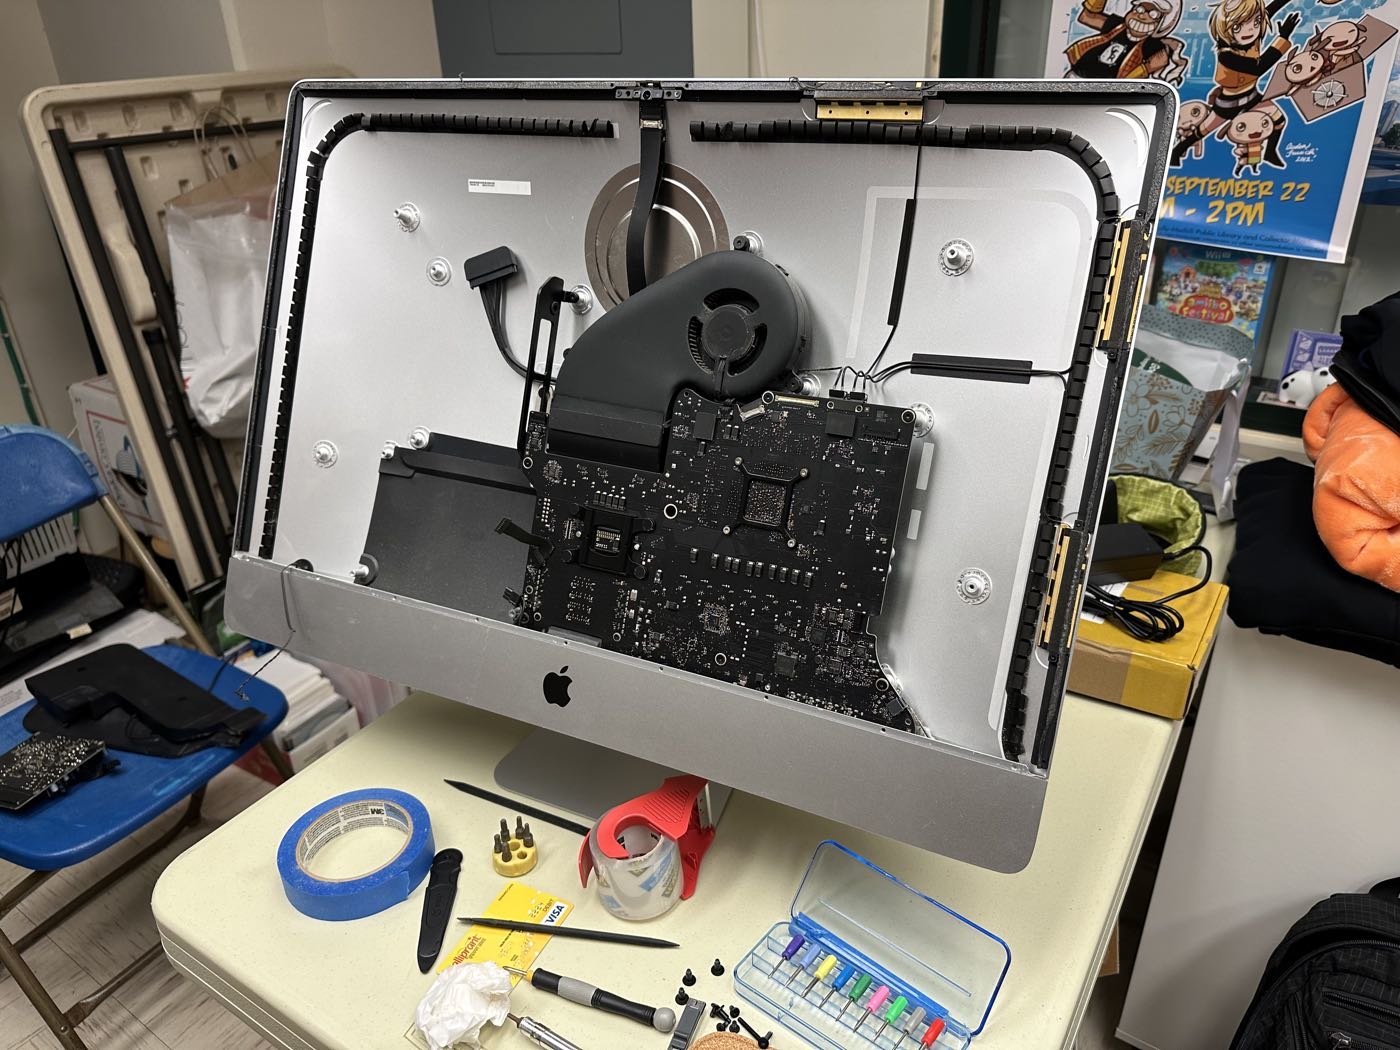
iMac chassis filled with iMac parts.
Once you know the LCD panel is working, it’s time to remove all of the components in the iMac by following this guide from iFixit. Optionally, you could figure out how to use the iMac internal speakers with the driver board and possibly other internal components, but you’d need to figure this out on your own.
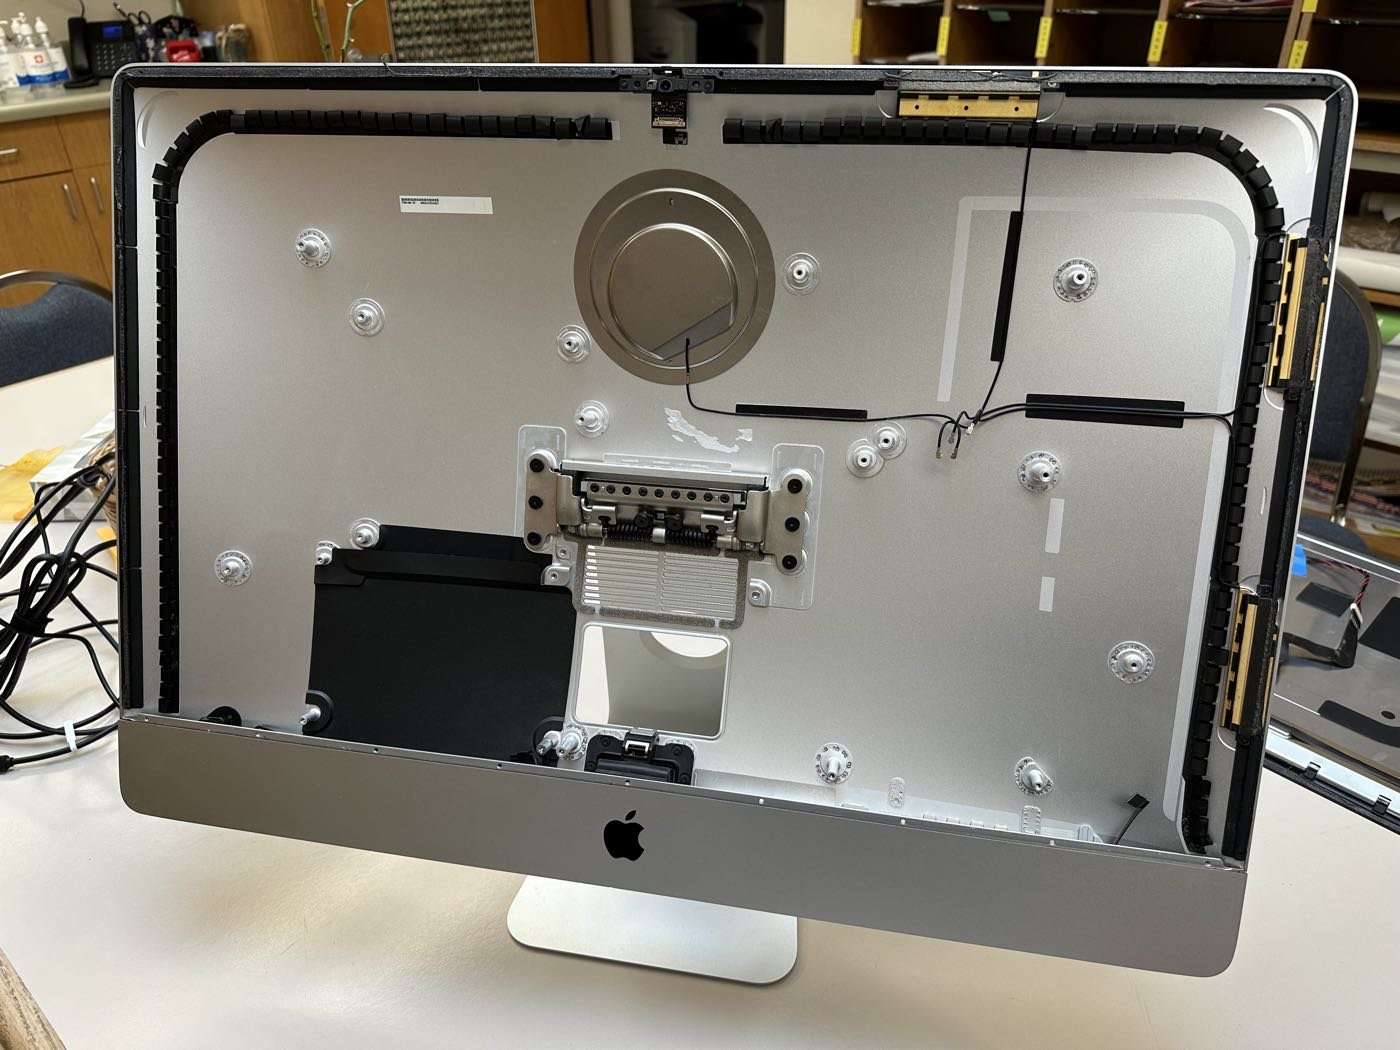
iMac chassis laid bare.
6. Determine where to mount the driver board and route cabling
Lay out all of the parts to make sure you know where everything is going to be mounted. Note: you don’t have to mount the driver board to the back of the LCD. This is your project and you can do anything you want!
Once the iMac chassis is empty, the next step is to plan where to mount the driver board and how to route the cables. The goal is to secure the driver board in a safe way and to have the cable extenders routed out of the iMac chassis RAM door area.
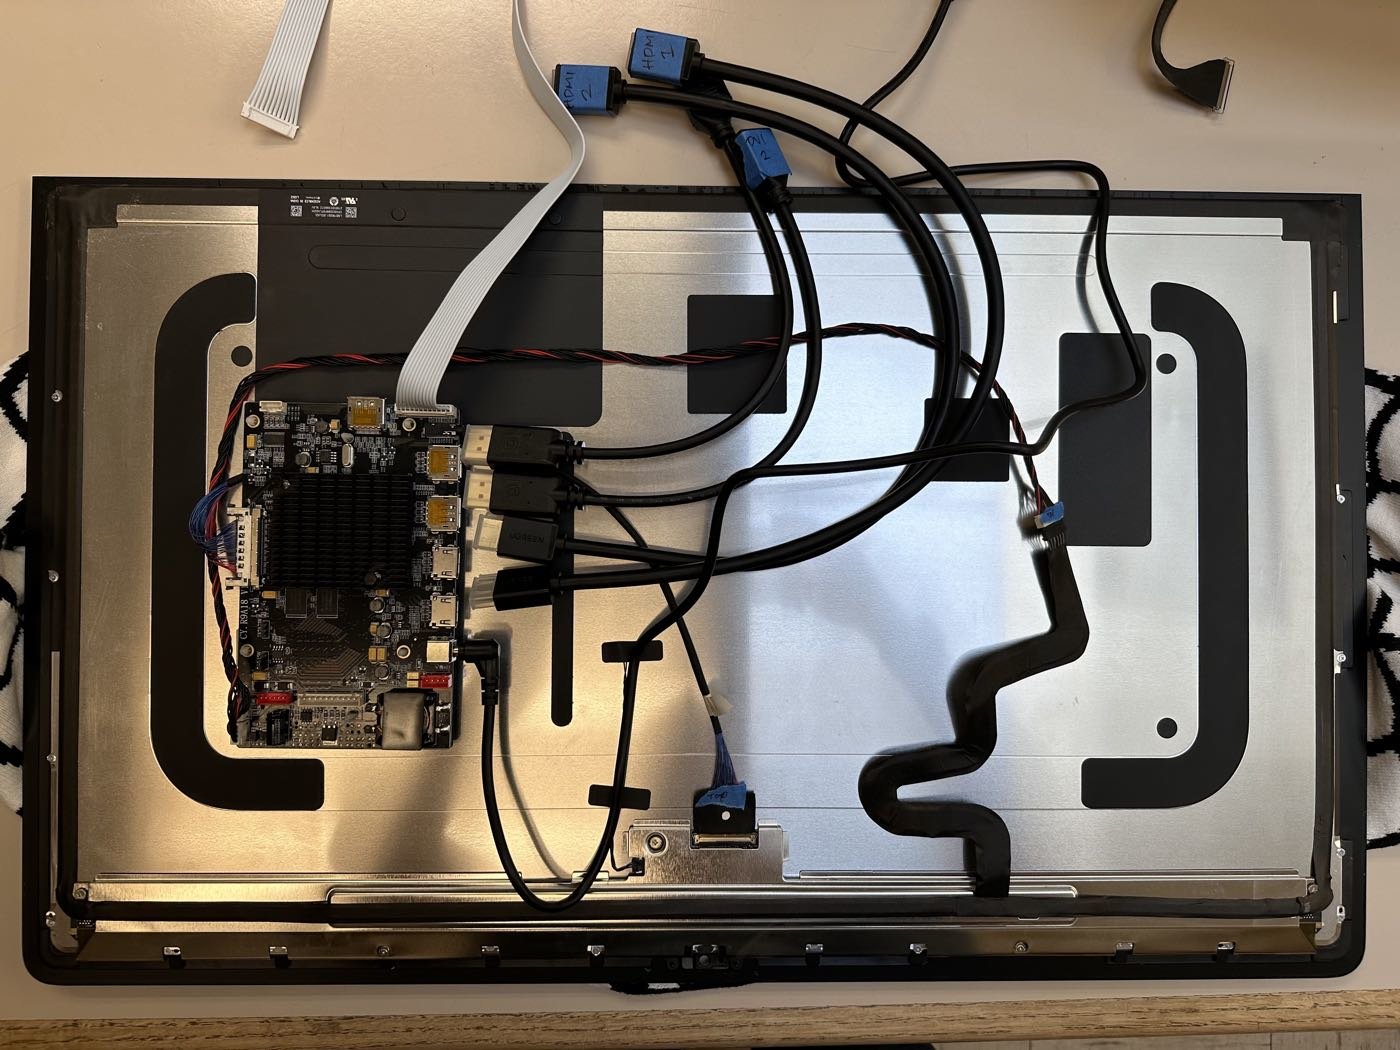
I chose to mount the driver board directly onto the rear of the LCD panel because it was flat compared to the iMac chassis, which is curved. It’s also important to note that the rear of the driver board cannot be touching anything metal.
Once I figured out where to put the driver board and cables, I used some folded packing tape and stuck it to the back side of it to temporarily hold it in place. I then attached each extension cable to the input of the driver board. Next, I carefully lifted the screen and positioned the bottom of the LCD panel on the edge of the iMac chassis opening, then carefully routed all of the extension cables through the RAM door opening of the iMac chassis.
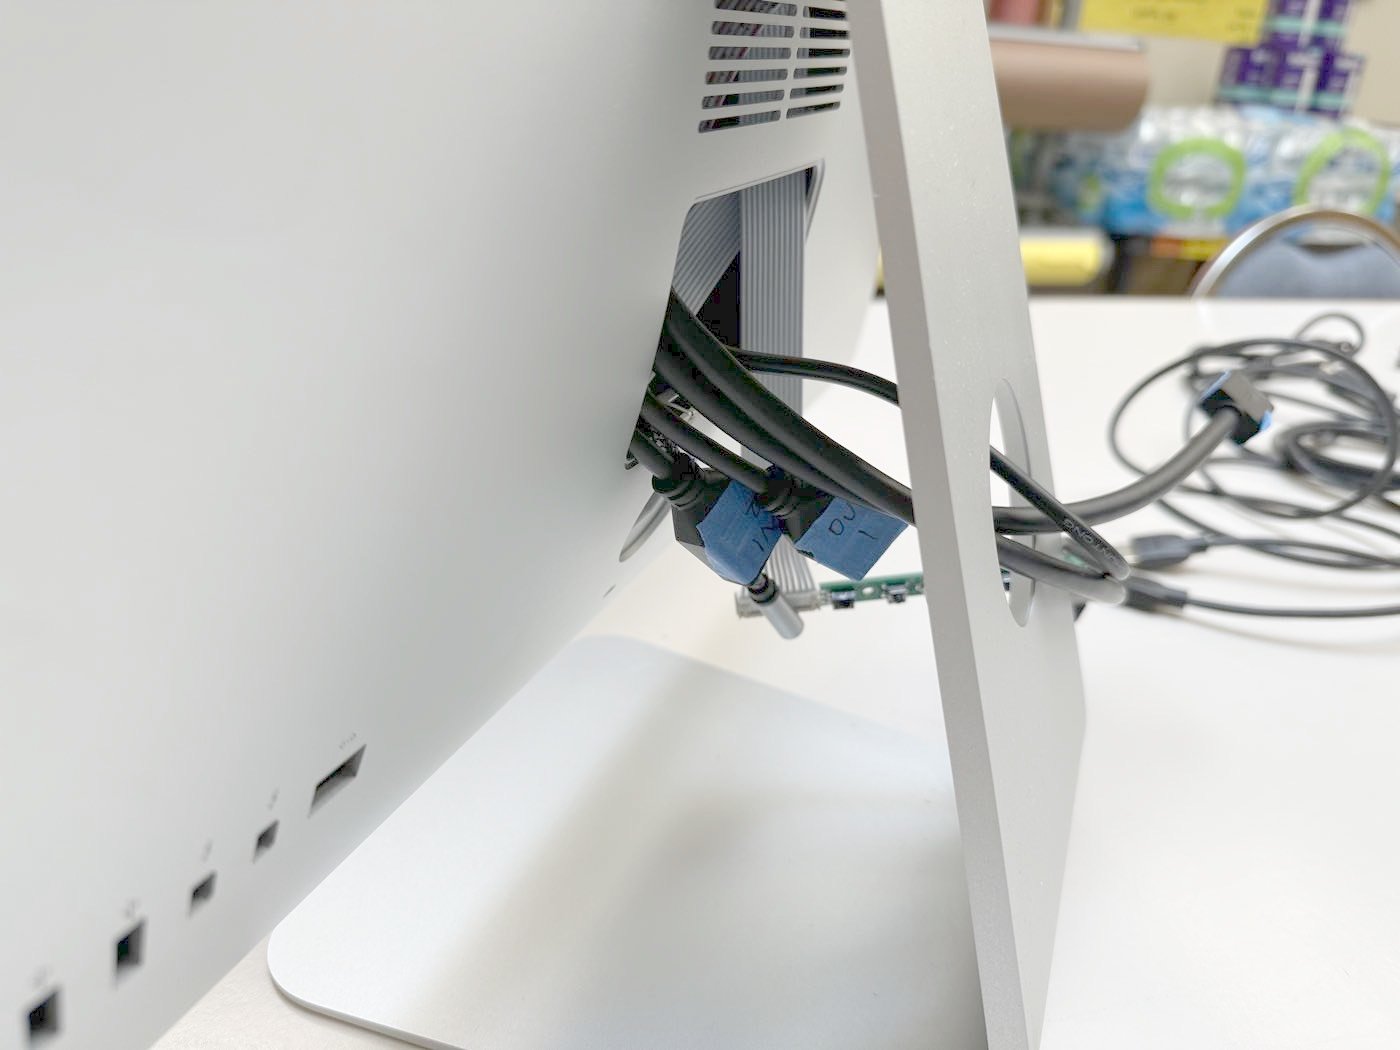
Extension cables routed through the rear of the iMac chassis. Everything seems to fix so far!
Once I knew that the driver board location was going to work and the cables had enough clearance out the rear of iMac, I placed the display back onto the table and carefully removed the packing tape from the back of the driver board. I placed 4 PCB spacer standoffs in the holes of the driver board and secured them to the same spot. Route the cables together neatly and attach them to mounts in various places with zip ties. Finally, label the cable extensions so you know which inputs are attached to the port.
7. Clean the iMac chassis and display

Peel off the adhesive from the iMac chassis and the screen to ensure the display sticks to the chassis when re-installing it.
If you haven’t done so already, be sure to remove the sticky residue from the iMac display and chassis prior to installing the new iFixit Adhesive Strips. I found that using a spuger or a plastic pick to scrape an edge of the tape up and then pulling it off at an angle helped.
Next, follow these instructions from iFixit to install the iFixit Adhesive Strips, but stop at Step 10, just short of actually peeling back the adhesive to permanently attach the LCD to the chassis. Use some packing tape to hold the display to the chassis securely.
8. Test the driver board and display AGAIN

To double check that everything worked, I routed the cables through the iMac RAM door, then taped the screen to the chassis with packing tape. Looks like it still works!
Better safe than sorry! Before using the adhesive tape to seal the LCD panel to the iMac chassis, be sure to check that all of your input connections work one more time.
Once you’ve confirmed that all of the inputs work as they should, it’s time to seal the iMac up by finishing up Step 11 of the iFixit guide.
9. Mount the keypad to the iMac and tidy up the cables
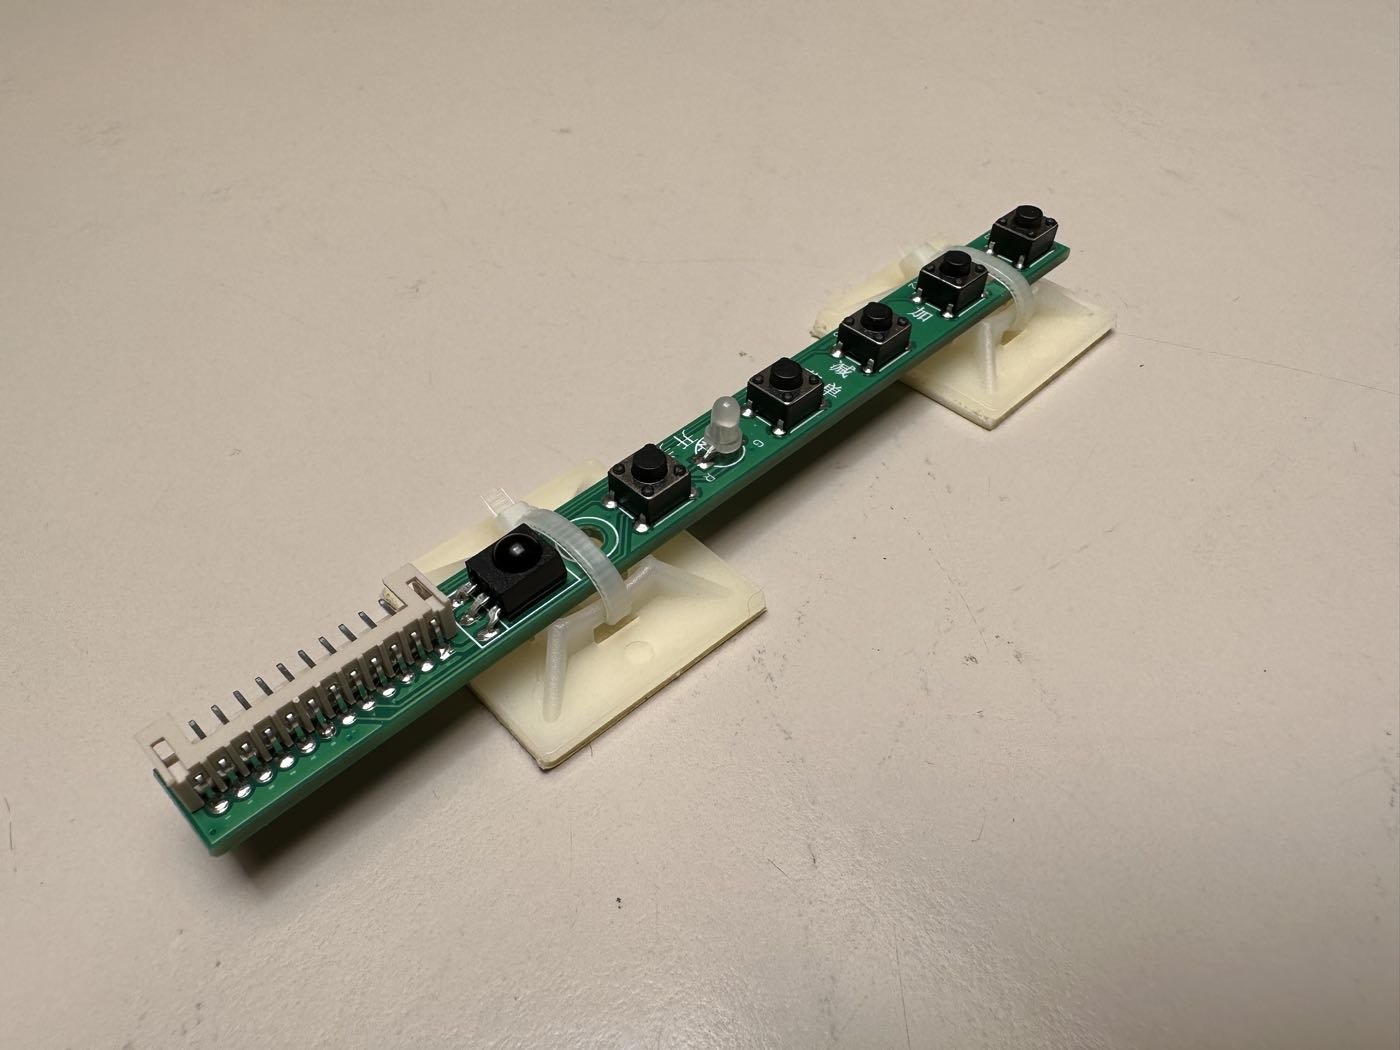
I used zip anchors to mount the keypad to the back of the iMac.
Last, mount the keypad to the iMac wherever you want. I decided to mount the keypad on the rear of the iMac so it’s out of sight and out of the way but still accessible. The rear of the keypad should not touch anything metal! I found that attaching it to two zip anchors was the easiest way to mount it without having to modify the chassis. Of course, you don’t have to mount this at all if you don’t want to.
The keypad controls are as follows:

Keypad button functions: 1. IR lens, 2. power button, 3. power indicator LED, 4. menu on / select, 5. select menu down, 6. select menu up, 7. input source.
Now you can clean up your wiring and make some nice labels for each input if you like.
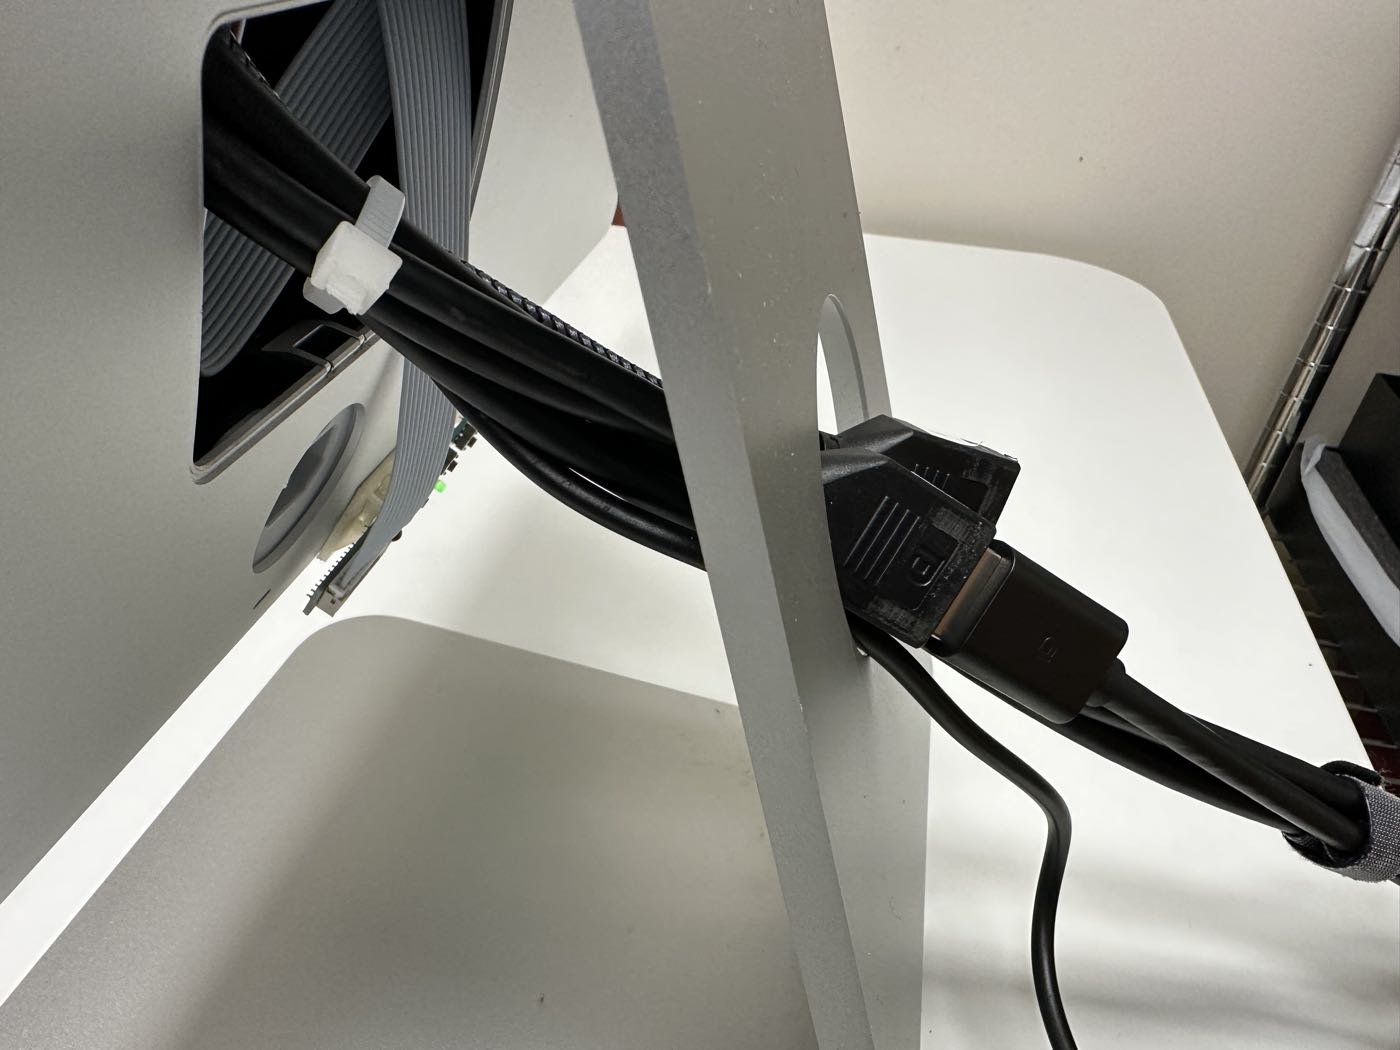
Tidy up the cables with some strap ties and labels.
10. Attach your Mac and enjoy!
And finally… it works!
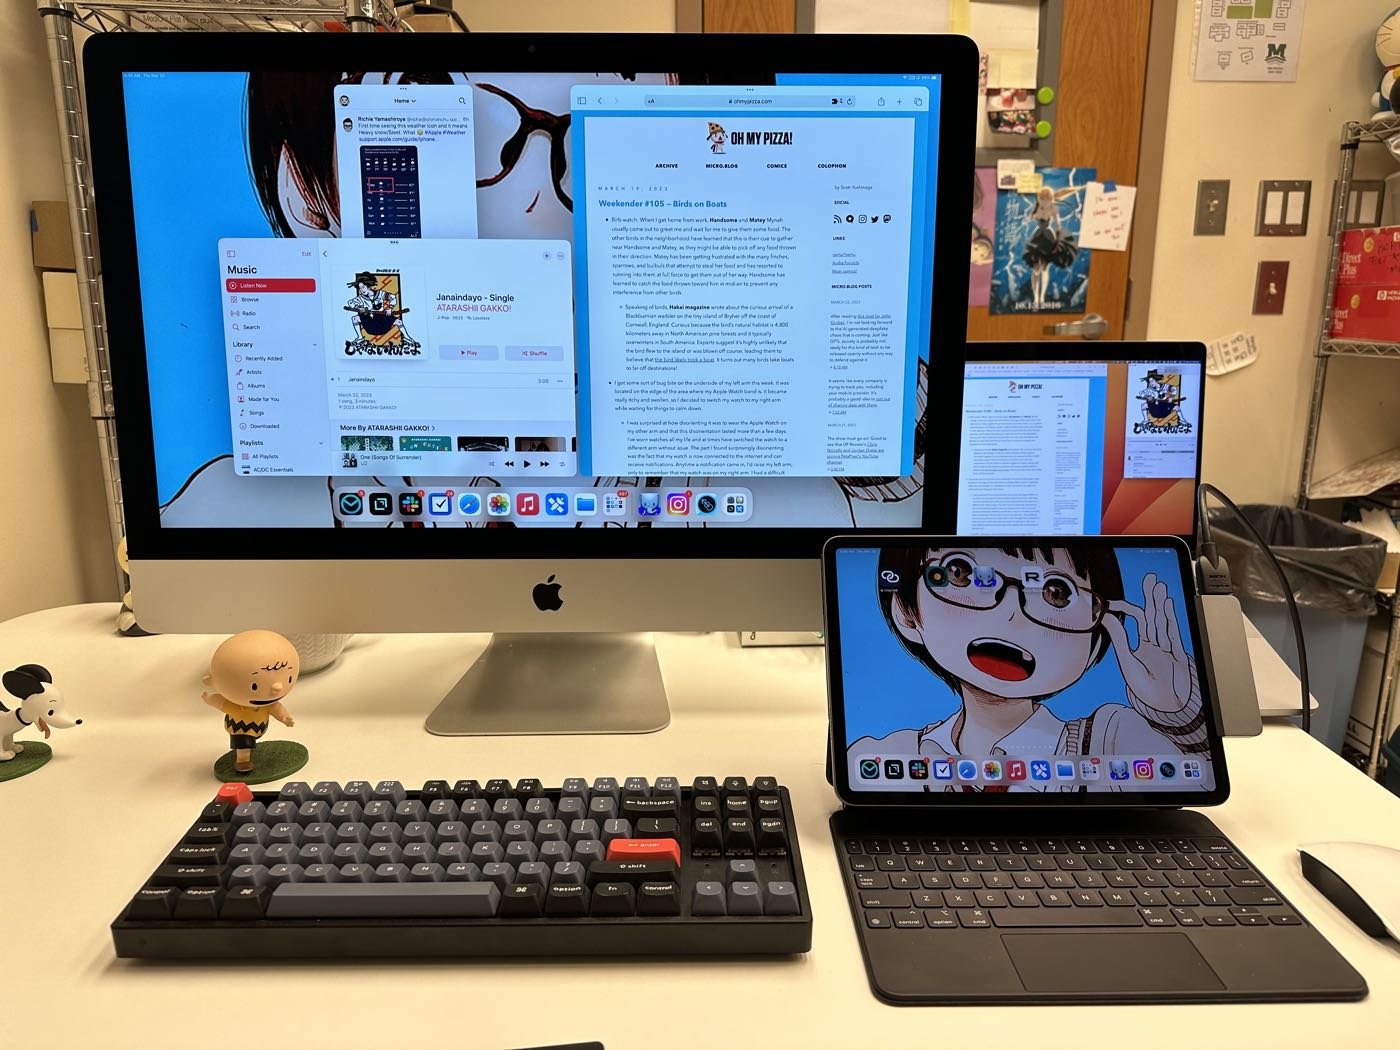
The 5K iMac external display connected to an iPad Pro via HDMI
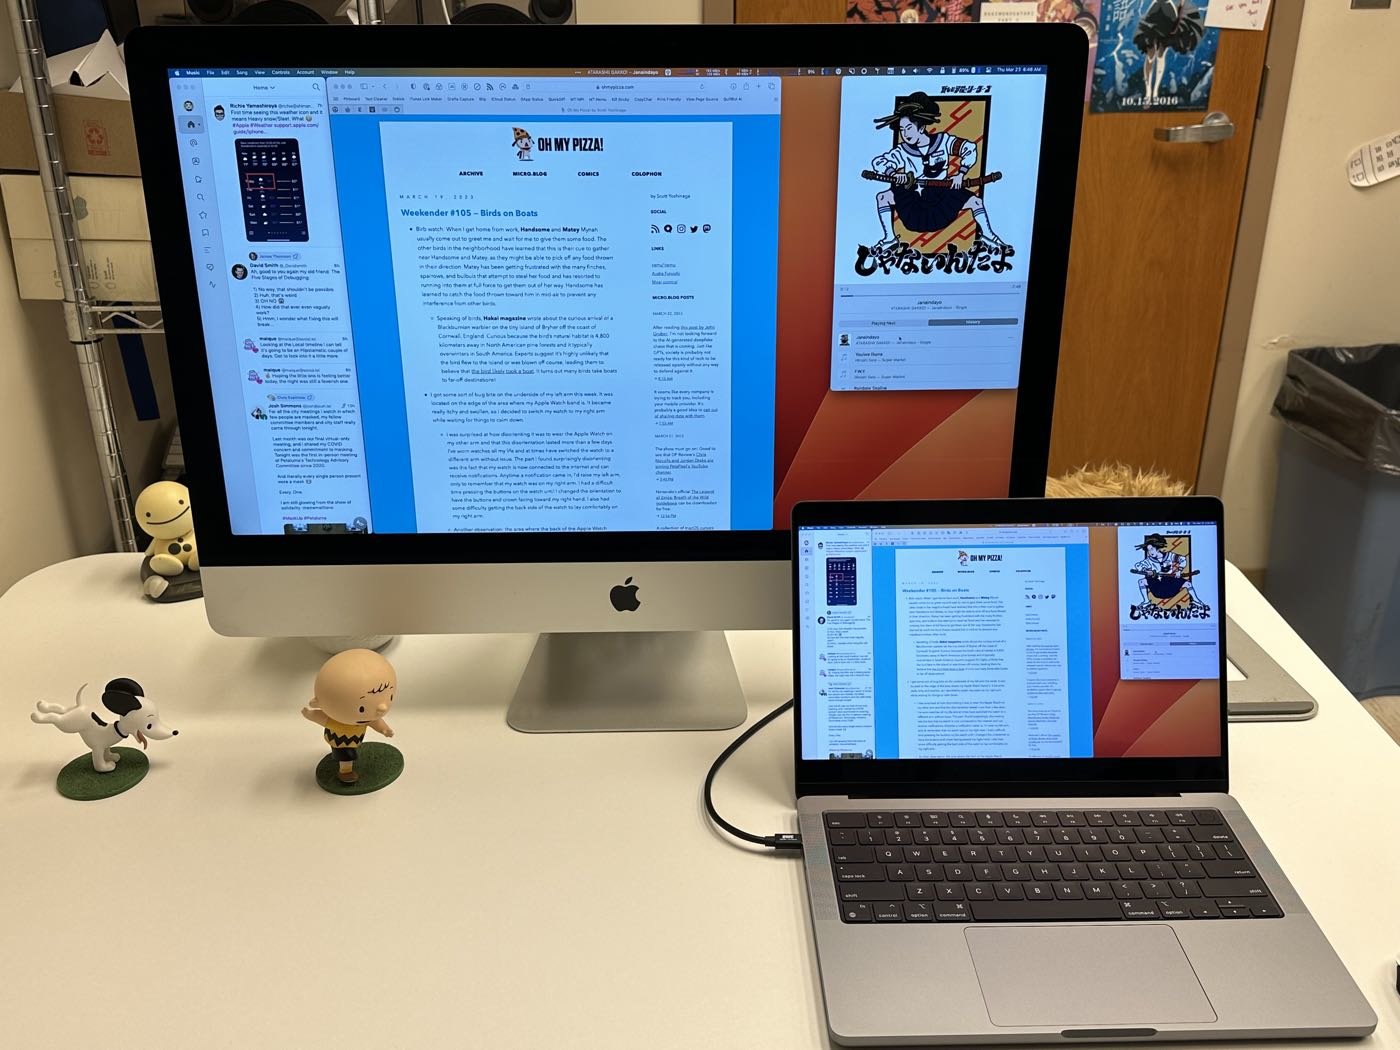
The 5K iMac external display connected to an M2 MacBook Pro using DP cable via CalDigit
-
There is a lot of information and inspiration on the MacRumors Forums. Also check out Mykola’s blog for driver board and 5K screen comparisons and Luke Miani’s video. ↩︎︎
-
Depending on the graphics card in your computer, a single DP connection can support up to 5K resolution. Some graphics cards will require the use of 2 DP cables to reach 5K resolution. The M2 MacBook Pro that I’m using had no problem with a single DP cable to drive the display at 5K.↩︎︎
If you find this helpful and want to support me, consider buying me a coffee
